

Sync metadata to Calabrio ONE
This topic details the procedures for collecting and formatting metadata from call variable keys in Five9 VCC with VoiceStream, creating metadata labels in Calabrio ONE Metadata Manager, and then mapping the metadata from call variable keys to Calabrio ONE metadata labels. After you successfully map variable keys to metadata labels in Calabrio ONE, you can use metadata to add a variety of trackable information to a contact in Calabrio ONE. Locate metadata fields in the Media Player details panel (located in the Interactions tab > Contact Information tab > open a contact) where you can view or delete metadata fields.
Prerequisites
You must configure Five9 VCC with VoiceStream as an ACD in Calabrio ONE.
Page location
- Application Management > QM Configuration > Metadata Manager (To create metadata labels)
- Application Management > System configuration > ACD Configuration (To map Five9 VCC with Voicestream call variable keys to custom metadata in Calabrio ONE)
- Interactions tab (To view custom metadata associated with recordings)
Procedures
Collect call variable keys from your Five9 VCC with VoiceStream system
Calabrio ONE uses Five9 VCC with VoiceStream call variable keys or custom call variable keys as metadata. Identify the call variables you wish to collect metadata on, and copy the call variable keys.
EXAMPLE You decide that call notes are important when supervisors review agent calls. Therefore, you copy and save the call variable key for call notes, "Call.comments".
IMPORTANT Call variable keys are case sensitive. When you enter call variable keys later (in the "Map Five9 VCC variable keys to metadata in Calabrio ONE" procedure), the keys must be exactly as denoted by Five9 VCC. Refer to the Five9 VCC Administrator's Guide for a full list of call variables and to learn more about custom call variables.
Create metadata labels in Metadata Manager
Before you can map call variable keys from your Five9 system, you must first create and configure metadata labels on the Metadata Manager page.
- Navigate to Calabrio ONE > Application Management > QM Configuration > Metadata Manager.
-
Complete the fields as described below.
NOTE You must select Text from the Metadata Type drop-down list on the Metadata Manager page to map metadata. Configure all other fields on the Metadata Manager page as desired.
Field
Description
Metadata Key
(Automatically generated) A unique identifier for the metadata field, used by APIs. The metadata key is generated based on the text you enter in the Metadata Label field. Spaces are replaced with hyphens, and “-key” is added at the end. For example, if you enter example text in the Metadata Label field, the Metadata Key field displays example-text-key.
The Metadata Key field does not allow ampersands (&) or equal signs (=). If those symbols appear in the Metadata Label field, they are removed automatically in the Metadata Key field.
Max characters = 39.
Metadata Label
The name associated with the metadata field that appears in search results and contact information.
Metadata Type
The type of information contained in the metadata field: date, hyperlink, number, or text.
ACD Data
This field is only applicable to on-premise deployments of Calabrio ONE.
Identifies the metadata imported from the ACD. Calabrio ONE reconciles ACD data by matching contact information in Calabrio ONE with call information stored in the ACD and changes the contact information in Calabrio ONE. The data is updated periodically.
When you map metadata to ACD Data, you must select Text in the Type field.
Data Explorer Key
(Optional) A unique identifier to map metadata with Data Explorer. You can map up to 20 metadata fields with Data Explorer.
Encrypted Check Box
(Optional) Select this option if you want to report on contacts based on custom metadata fields. If you select this box, Calabrio ONE encrypts the metadata when stored. The Encrypted check box is enabled only if the Exportable check box is cleared.
NOTE You cannot search for encrypted metadata.
Exportable Check Box
If selected, you can export the metadata via Calabrio ONE or an API. This check box is selected by default.
Read Only
If selected, the metatdata is read-only. You cannot add or edit metadata to a contact through Calabrio ONE.
NOTE If the metadata is ACD data, this check box is selected by default and is disabled.
- Click Save.
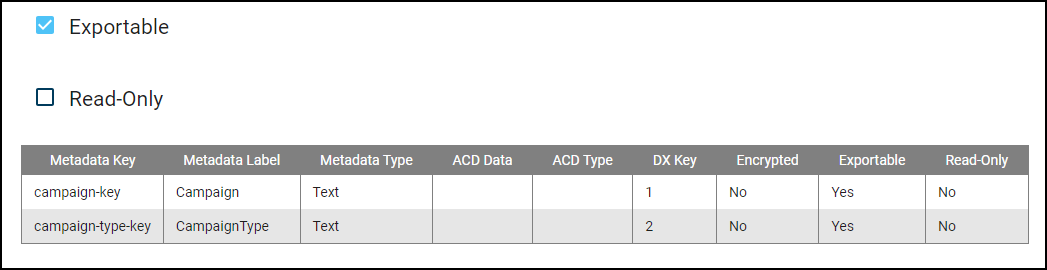 (This image illustrates metadata labels configured on the Metadata Manager page.)
Map Five9 VCC variable keys to metadata in Calabrio ONE
After collecting call variable keys and creating metadata labels, follow this procedure to map the call variable keys and metadata labels to each other.
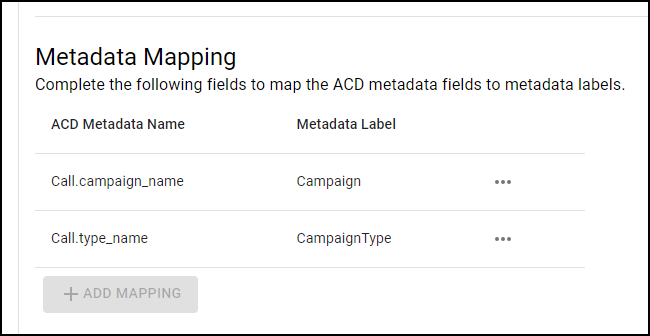 (This image illustrates two call variable keys mapped to metadata labels.)
- Navigate to Calabrio ONE > Application Management > Global > System Configuration > ACD Configuration.
- Under Select ACD, click Add.
- Select Five9 VCC from the Select ACD drop-down list.
- Click OK. The Five9 VCC ACD Configuration page appears.
- Within the Metadata Mapping section, click Add Mapping.
- In the text box under ACD Metadata Name, enter a Five9 VCC call variable key. This field is case-sensitive, and your entry must exactly match the call variable key.
- Click the drop-down list under the Metadata Label column, and select a metadata label from the list of options. The list of options matches the table of metadata labels on the Metadata Manager page.
- Click the check icon to save the metadata mapping.
- (Optional) Click Add Mapping to add additional metadata mappings and repeat as desired.
- Click Save.
View custom metadata associated with recordings
- Click the Interactions tab in the top navigation bar.
-
Click the List options icon in the top-right corner.

- From the drop-down list, click Show/Hide columns. The Show/Hide columns window opens.
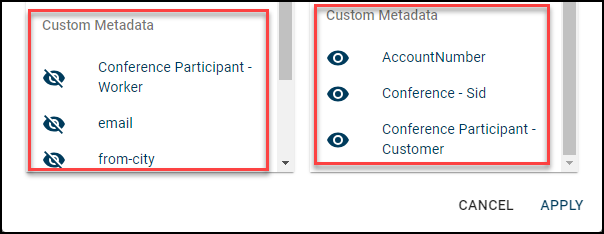
- Find the Custom Metadata section under Hidden columns.
- Select the custom metadata values you want to show on the Interactions page. The metadata you select appears in the Shown columns table.
- Click Apply.
Related topics